

Today for Part 1, I'd like to share with you how to create a Gingham Pattern with paint.

Gingham is such an easy technique to reproduce with paint, and it is suitable for both boys & girls.
Below, you will that the gingham technique was used as the background for this girls name hanging.

All you need to reproduce this effect is a wide flat paintbrush, a roll of painters tape, and some watered down acrylic paint in your choice of color... {of course, you will need your prepped surface}
1. Begin by ripping long strips of tape the length of the surface you are painting. You will paint your stripes in one direction before painting the other.

2. I like to place my first line of tape in the center {or close to center as possible}, then place the next 2 strips of tape right next to that one. ie, line one - centered, line 2- to the left of the centered strip, line 3 - to the left of the second strip. Place them as straight and close as possible without overlapping.
*Your second piece of tape will become your spacer for all of the other lines of tape.

3. Now carefully pull up the strip of tape in the middle of the three and place it to the left of the 3rd line of tape... almost like playing leapfrog with your tape strips.
*Continue placing tape strips next to one another- removing the center of the 3 until your whole surface is complete like shown below. Run your hands over the tape edges for a good seal or your paint will run underneath in the next step.
4. Now with your paint wash {I like 1 part paint to 2 parts water for a nice light wash} lightly cover any untaped areas of your canvas.

5. Allow a few minutes to dry and remove your tape strips carefully.
{hint* I press my strips of tape on the wall next to me so I can reuse them for the next step}
6. Repeat the process of placing tape along the surface in the other direction, wash with paint, allow to dry and remove the tape.
* Please do not get too hung up on any small runs of paint which may have seeped under your tape edges... I fell they only add to the texture of the gingham. We are striving to recreate a fabric pattern and those small imperfections lend to the character of the piece!

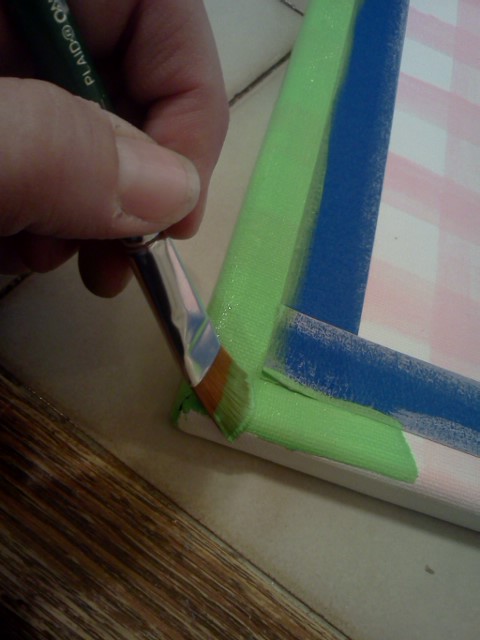
Bonus technique* Creating a border with your tape!
Measure from your surface edge in and place tape around all four sides of your canvas or other surface, allow the pieces to overlap at this time.
Using a sharp edge {I simply use one blade from my scissors} carefully and lightly score and remove the overlapped pieces of tape to create a sharp corner edge.

When all of your sides and corners are taped, add your border/trim with your choice of color like shown below. Baby pink pops when paired with an apple green!
Painting is fun! Learning to paint takes practice... and yes, even those who've painted for years
make MiSTaKeS!
see below? I wanted to letter the name in all lower case... hated it!
And as I was carefully wrapping the canvas to go to it's new home, I realized
in HoRRoR
that
I
misspelled the name!
I chose to start over... and so can you!

Next in this Easy Paint Technique Series will be painting these pretty little flowers! Grab your paint and raid your button jar for these cuties.
Be sure to follow along and come back to paint with me!


Be sure to pop back {here} and link up to tip toe thru tuesday! I can't wait to see what you've been up to! Share your projects, your recipes, your giveaways and your Etsy shops Too!
Until Next Time...

{disclaimer- this post contains affiliate links. I may recieve a small percantage or compensation for any purchases made by clicking through these links provided. For more information please see my disclosure policy here}
10 comments:
What a cute project! Thanks for a great tutorial
that turned out really cute! i actually like the 2nd one better!
That's really pretty x
That is very pretty!
Hi! Visiting from the Shabby Creek cottage. Ohh.. what a great tutorial! Ill have to try and paint some gingham! I think it turned out great.. even if you had to paint it twice :)
Im your newest follower.. I would love a follow back if you like my site too. And please feel free to share this at my Friday party starting tomorrow!
They look so cute! And I love the flowers in the corners x
Kimberly,
I'm guilty of never painting a canvas. For some reason, it just seems scary. I think I'll have to try it out! Thanks for helping me through my scardy-cat ways.
I'm visiting from the Sunday Show-off party. I would love it if you stopped by my blog.
Thanks for sharing,
Laura
Thanks for linking up to the Tuesday To Do Party! Hope you'll come again this week! This month's Pretty Packages party is now up for any of your lovely wrapped gifts!
http://blackberryvine.blogspot.com/2012/04/pretty-packages-party-14-highlights.html
Smiles!
Jami
www.blackberryvine.blogspot.com
Turned out wonderful!
Thanks for sharing at our Sunday Round Up.
xoxo
Heather
www.HeatherlyLoves.com
Very sweet!
Post a Comment