Monday, April 30, 2012

It's not easy being {Key Lime} Green!

Pin It
Oh baby, It is NOT easy being green, especially lime green.


I love color... I can spend an hour in Home Depot or Lowes just staring at all the paint samples... buying up every cheap can of Ooops paint I can get my hands on.  All of my children's art are bright, cheery and colorful.  I love to experiment with color in my art.  It's taken a while, but the bright apple-ish lime-ish home accents I've seen explode around blogland this year have won me over...
                
                 or so I thought!

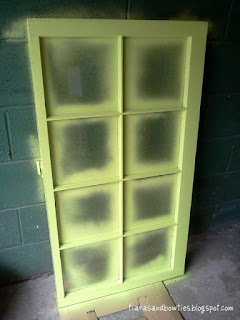
It all started with an old window and an idea... oh yes and a can of Key Lime Green spray paint!

believe you me... it's brighter than it looks.

After seeing that beautiful pop of lime green coat the window... I began my mission - spray in hand, to brighten up my front porch a bit.  You know those little pops of color that pull you in to a space?
I grabbed a Dollar Store resin statue I had picked up a few months back {with the intention of sprucing it up a bit} and started spraying!  I had a before shot, but of course, can't find it now! 


The front porch is getting a bit shabby {see the chippy banister railing there just screaming for some new paint?} but for now, I'm trying to just go with that Shabby feel and add some fun- welcoming- summery touches to brighten up the space {and distract the eye from the drabs}.


Oh, I just loved how these cute little birds just screamed "Hello".  I was proud of myself for taking a leap out of my usual boring soft color pallate and adding a pop of modern decor {if I can get away with calling a dollar store chachtke painted lime green modern decor}.  I just couldn't stop there!

Did I mention the Hubster wasn't home yet?

'cause you all know that's when the BeSTesT most creative ideas strike, right?

So with can in hand... I pulled the sad little mailbox off our wall.

{yes... it's been like this for over a year now... I had great plans for this mailbox...}

It's on our outter wall, right next to the front door... we RENT, the box was pretty crappy, I hated it, in rental world if it ain't broke... it doesn't get fixed... so your crafty renter... paints it!  Seeing as how last years makeover was never completed, I decided to give it a 'pop' of color too and hung it back on the wall!


Now, I know what you are all thinking I've went completely utterly bonkers, and truth be told... I hated my new color choice for that little mailbox.  The photos really do no justice to the vibrancy of this color!  Seriously, Glow in the DARK green.  I really don't want to be known as the crazy, craft hoarder, lime green lovin' lady who lives at the end of the street...BUT dinner needed to be cooked, so I decided I'd wait and fix it another day.

Hubster came home right as I was cleaning up my mess... looked at me and said,
"You're gonna paint that right?"
Me: "I Just did!  Don't ya love it!"
...dead silence on hubby's part as he quietly shook his head back and forth and entered the house.

I realized that perhaps lime green is not for me.  It's been 2 weeks and the color is still not growing on me but that's the great thing about paint!  If you mess up, just start over... it's only color, so pick a new one!  Hubby still thinks I love that little green mailbox as of today and I'll let him keep thinking I love that kermit colored box that "pops" with color from at least 150 feet away!  Well, for a little while anyway, til I get another can of spray paint!

Wondering what I did with the window?
You'll have to stop back next time to see that!

Don't forget to get back over here tomorrow and link up your projects from the week at Tip Toe Thru Tuesday... You will not want to miss it!  Remember these words...' Huge Giveaway!"


If ya like it, leave me a comment,  Follow along on FB my friend, Plus me on Google, Put a pin in it on Pintrest...

Saturday, April 28, 2012

Seeking Sunday

Pin It
9 doctor appointments in 3 weeks.  Crazy Busy!

Broke down car.  Darn it!

Dirty house.  Yuck!

Nephew leaving Tuesday for basic training for the US Air Force.  Sadness.

Surgery scheduled for daughter's ear in less than 2 weeks.  Pain.

Genetic testing for a gene mutation.  Answers received?  More questions raised.

Crashed Lap top.  The Horror!

Death of a Friend. 

Laundry piles.  Stinky!

3 little league baseball games in less than 24 hours.  2 games lost {boo}.  1 WiN! {yipee}

Romans 8:28And we know that for those who love God all things work together for good, for those who are called according to his purpose.

 Life is Amazingly Beautiful!  Really?

Yep!

Not everything is good.  That's the truth.

Make a choice.  Be MiSeraBle... or choose to Be HaPPy!

Much like baseball, you win some you lose some.  Doors close, but windows open!  The unknown will always be there...

Choose to Be HaPPy... it is a choice ya know.

Realizing that all of these - the good, the bad, the sunshine, the rain, the pain, the laughter, the clean, the dirty - are all working together {somehow} by God's plan for our UltiMaTE well-being.

HE is there... he knows the purpose. 

I am choosing to see the rainbow through the rain. 
Am I perfect with this... heck to the NO... but I'm trying.

What's happening in your life?  Share your joys.  Share your struggles.  Need a prayer or wanna offer a prayer for my Alexis?  Don't be shy!  I'd love to hear from you!


Thursday, April 26, 2012

Growing Up Healthy by Growing Naturally

Pin It

This is a Sponsored post written by me on behalf of Whitney Farms for SocialSpark. All opinions are 100% mine.

As the mom of a medically complex child and a very busy 10 year old, it's extremly important to me to provide them with every opportunity to grow up as healthy as they can!  Providing healthy and nutritious snacks and meals has become a big priority in our house - having lots of fruits and veggies around is a must... but can be quite pricey as you may know!

So, now that summer is peeping around the corner - I'm looking forward to getting my hands dirty and planting an even bigger and better veggie garden than last years 2 tomato plants, a strawberry bush that produced about 5 strawberries {whoopee}, 3 kinds of herbs, and 5 string bean plants!  Our garden last year was not a complete FaiLuRe but I know that my 'crop' would have produced more abundantly if had taken the time to properly prepare my soil and feed my plants!

This year is going to be different with the help of Whitney Farms® line of 100% organic plant food and organic soil

Whitney-Farms-Logo_Banner_New_C.jpg (6 documents, 6 total pages)

With Alexis' compromised immune system and her body developing so many food allergies I've made a push to provide as many 'clean' foods as possible.  We are all exposed on a daily basis to harmful pesticides, chemicals, and pollutants just in the air we breathe... having peace of mind that the yummy foods grown in our garden are all natural and additive free is priceless!   Whitney Farms® full line of products provides just that; peace of mind knowing they are all 100% organic, from the earth, with NO artificial additives.

I'd love to have a few compact container gardens around my yard like this... functional beauty!


Perhaps a larger raised bed like this {if the hubster feels like getting dirty too} using organic soil.


Source: bhg.com via Kim on Pinterest


When I'm ready to get that garden going, no matter what size, I know I'll be using some Whitney Farms® products... especially the Tomato and Vegetable Food.  There is nothing quite like a fresh tomato fresh from the vine!

109103_1.jpg (6 documents, 6 total pages)

Whitney Farms® has been around for 25+ years and their products have only improved with time Some great features worth mentioning:

- Easy to apply

- Low to No Dust {great for allergy & asthma suffers like I have}

- No Manure Smell!  {That's important peeps... I'd rather be smelling the magnolias and roses}

- Contains beneficial macrobes

- Specially designed protein- based blends...which provide both the macro and micronutrients needed to produce thriving beautiful plants

Advertisement

They have even offered Tiaras and Bowties readers a printable coupon for $3 off so you could give their products a try!  CLICK {HERE Whitney Farms®} TO GET YOUR COUPON!

I'm excited to start planting and look forward to a bigger better garden this year so that my kids can grow up healthy by growing Naturally healthy foods!  Are you ready to take the organic plunge in your garden this year?

Visit Sponsor's Site

Tuesday, April 24, 2012

How to Paint Gingham

Pin It
Things have been mighty busy crazy around here, but I've had a bit of time to play with paint!  An old friend contacted me for a name canvas for her nieces bedroom door so I got to playing.  This canvas is made up of a few pretty simple paint techniques that produce a very pretty finished product so I thought maybe I'd share some How To's with you.  Feel free to use the techniques on their own or together in your own projects!

 Today for Part 1, I'd like to share with you how to create a Gingham Pattern with paint.


Gingham is such an easy technique to reproduce with paint, and it is suitable for both boys & girls.
Below, you will that the gingham technique was used as the background for this girls name hanging


All you need to reproduce this effect is a wide flat paintbrush, a roll of painters tape, and some watered down acrylic paint in your choice of color... {of course, you will need your prepped surface}

1.  Begin by ripping long strips of tape the length of the surface you are painting.  You will paint your stripes in one direction before painting the other.


2.  I like to place my first line of tape in the center {or close to center as possible}, then place the next 2 strips of tape right next to that one.    ie, line one - centered, line 2- to the left of the centered strip, line 3 - to the left of the second strip.  Place them as straight and close as possible without overlapping.

*Your second piece of tape will become your spacer for all of the other lines of tape.


3.  Now carefully pull up the strip of tape in the middle of the three and place it to the left of the 3rd line of tape... almost like playing leapfrog with your tape strips. 

*Continue placing tape strips next to one another- removing the center of the 3 until your whole surface is complete like shown below.  Run your hands over the tape edges for a good seal or your paint will run underneath in the next step.

4.  Now with your paint wash {I like 1 part paint to 2 parts water for a nice light wash} lightly cover any untaped areas of your canvas


5.  Allow a few minutes to dry and remove your tape strips carefully.
           {hint* I press my strips of tape on the wall next to me so I can reuse them for the next step}

6.  Repeat the process of placing tape along the surface in the other direction, wash with paint, allow to dry and remove the tape. 

* Please do not get too hung up on any small runs of paint which may have seeped under your tape edges... I fell they only add to the texture of the gingham.  We are striving to recreate a fabric pattern and those small imperfections lend to the character of the piece!


Bonus technique*  Creating a border with your tape!

Measure from your surface edge in and place tape around all four sides of your canvas or other surface,  allow the pieces to overlap at this time.

Using a sharp edge {I simply use one blade from my scissors} carefully and lightly score and remove the overlapped pieces of tape to create a sharp corner edge.


When all of your sides and corners are taped,  add your border/trim with your choice of color like shown below.  Baby pink pops when paired with an apple green!


Painting is fun!  Learning to paint takes practice... and yes, even those who've painted for years

make MiSTaKeS!

see below?  I wanted to letter the name in all lower case... hated it!

And as I was carefully wrapping the canvas to go to it's new home, I realized

in HoRRoR
that
I
misspelled the name!

I chose to start over... and so can you!

Next in this Easy Paint Technique Series will be painting these pretty little flowers!  Grab your paint and raid your button jar for these cuties.

Be sure to follow along and come back to paint with me!


Be sure to pop back {here} and link up to tip toe thru tuesday!  I can't wait to see what you've been up to!  Share your projects, your recipes, your giveaways and your Etsy shops Too!

Until Next Time...


{disclaimer- this post contains affiliate links.  I may recieve a small percantage or compensation for any purchases made by clicking through these links provided. For more information please see my disclosure policy here}

tip-toe thru tuesday time!

Pin It
hello lovelies!!  in case you haven't heard already, tip-toe thru tuesday is now co-hosted by myself and Andie from Crayon Freckles!  here's the new button for the party!


tiptoethrutuesday


here are the toP 2 pOSts from last week plus one of mY faVEs.  don't forget to check out Andie's Favorite over at Crayon Freckles.  if you're featured, grab a fEAtuRed button from my button page!


Reinventing a Sewing Machine from A Girl and a Brush
I'd love it if you followed Tiaras and Bowties!  You can find me on GFC, Linky Followeres, FB, and Google+!  I have a BiG suprise coming up for you next week, a few of my favorite things for Mother's DAy!  Follow along so you don't miss it!

now, it's time to party!!

PoST aNYtHiNG you've created (show me some etsy shops and giveaways!)

Feel free to share several posts

Link back to my page somewhere on your blog

Stay around and check out a few other links. wE aLL LovE fEEdBaCK!

Friday, April 20, 2012

Trashy Fire Pit

Pin It
This one is for the hubster!

Hubs has been wanting a fire pit for the longest time, but not being a necessity... wasn't happening.
UnTiL...
best wife ever found this beauty headed for the dump!
I know what you're thinking!
Why would anyone want to just dump such a great piece of lawn decor, RiGht?
                                                                                         No?
Yea, well hubster didn't agree either,
UnTiL...
I introduced him to a little can of whoop butt I know.
Rust-oleum Specialty High Heat Ultra Spray in Black Gloss.


Rusty, ugly little fire pit
+
a half hour of cleaning and 1 can of spray...


=
Countless hours of family FuN!

 Smores...

 togetherness... and more smores, yummm!


Thanks Rust-oleum!


           {this is not a sponsored post BTW, just sharing another trash to treasure with you!}

Don't forget to pop over here and link up what you've been working on this week!  Can't wait to see!

Thursday, April 19, 2012

Take a Leap of FaiTH!

Pin It

Many of you may be familiar with the old kid's poem which starts out, "I know you get discouraged because I am so small".  That keeps running through my head today, only it goes more like this:

"I keep getting discouraged because I am so small"

...now not because I leave finger and handprints on walls and certainly not from a size standpoint, but
from a business/blog standpoint that's how I've been feeling.  The point of this post is not so make you suffer through my whiney boo hoo feelings. 

It's about taking a leap of FaiTH! 
It's about starting SoMwheRe.

I read a post the other day {and posted a link on FB, so if you follow Kimberlys Sminkey Designs on FB you may have seen it} from Chris Brogan about being okay where you are because it means you are somewhere.  Really made me stop to think.  If you're fat {like me} and want to be skinny,  If you're business or blog is small and perhaps struggline and you want more than anything to succeed... be okay where you are and take small steps to get where you want to be!  Like a baby learning to walk, we are certainly gonna wipe out a few times but it will get easier.

My LeaP of FaiTH has begun.  I am okay with where I am at BuT I am taking baby steps to get where I want to be.

I recently took a step to securing a garage, near my home {across the street actually} where I will now set up my very own little sudio!  I've wanted a place to call my own, work on bigger projects, get the crap outta my dining room.
YeS, it is scary for me to take on the added monthly bill for the rent of my studio... and I almost backed out.  Baby Steps!
It's a bit rough around the edges...

 It's a bit dirty right now... and honestly other than cleaning up, I'm not sure if I'll 'pinkify' it or girl it up... the hubs seems to think this gargae is half his?  Don't know where he gets that idea from, lol.

I guess I kinda gotta have to let him in... he is cleaning up the spinder webs and gook and such.


I know it's not much right now... but BaBy StePs!
I've been able to spray paint whenever I want which is a big plus!

So ladies and gents... that's that for today!  Be okay with where you are right now... we all have to start somewhere, right?   Don't forget to link up your projects in our Co-hosted linky Tip Toe Thru Tuesday {here}


Related Posts Plugin for WordPress, Blogger...