

I didn't forget- Life just happened...
Let's Talk Cake today.
Yes, you can have your cake and not be so stressed over what it costs to eat it too!

Now, I'm not advocating we egg the local bakery and boycott their services. If you have a fantastic cake in mind and you know you cannot replicate it or can't bake to save your life, by all means- go ahead and order your cake! If you are the DIYer type and can ice a cake, I am going to tell you that you can have a beautiful cake for your day made by your hands!
Now, keep in mind... I am not a Pro, my methods may not be 'the' way of doing things but they have worked for the many cakes I have done over the years. There are lots of great sites around with step by step directions from baking to adding that last touch...so I'll spare some of the messy details instead of trying to reinvent the wheel!
For this cake, I started with 12'', 9'' and 6'' pans. After baking each cake, set them aside to cool slightly.
Tip 1: For the moisted cake ever... wrap in foil while still 'warm' and pop it in the freezer for a few hours!

Cut, fill and ice each layer next or for a taller cake stack and two of the same size cakes instead of cutting layers... be creative with your filling; it's the best part! For this cake we chose strawberries and cream for the vanilla tier and cookies and cream for the chocolate tier.

Tip 2: For a smooth surface... enlist the help of a paper towel!
Seriously, if you cannot get your buttercream icing as smooth as a bakery cake try a paper towel! Simply set your cakes aside for a bit in a cool place to allow the icing to set a bit. Choose a brand of paper towel that is smooth {without quilted flower} and lightly lay it on the iced surface. Gently smooth your palm or fingers over the surface and lift off. Don't press too hard that the icing sticks to the paper. Simply repeat all over the cake top and sides grabbing a clean paper when the icing oils start to seep in. I promise, you will get a very beautiful surface... sometimes smoother than the bakery's!
I've stacked cakes in many ways, both with and without the use of a cardboard base. For this cake I chose to ice each cake on a cardboard base so they could be disassembled and cut at the wedding. Your local craft store sells so many wonderful items to use to build your own cake... each with a just lovely price tag. You do NOT need to spend a fortune. Instead of using those pricey little wooden dowels - use cheap old BBQ skewers or even drinking straws! Believe it or not, those little flimsy straws are very strong when used in numbers and standing straight up and down!

Tip 3: Use cut to size BBQ skewers or Drinking Straws to support the tiers of your cake!
After your cake is stacked you are ready for the FUN part! Now is when you can pipe a simple little border to cover those not so pretty edges... add as much of as little detail as you are comfortable with.
If you want your cake covered in buttercream roses... do it! Gum paste and fondant are so much fun to play and work with {bring out your inner child- it's like playing with clay} they do take practice but you can do it if you set your mind to it! There are tons of Utube videos out there to teach you.
But if all of that sounds a bit too complicated...
Tip 4: Go Faux with your Cake Flowers and trim!
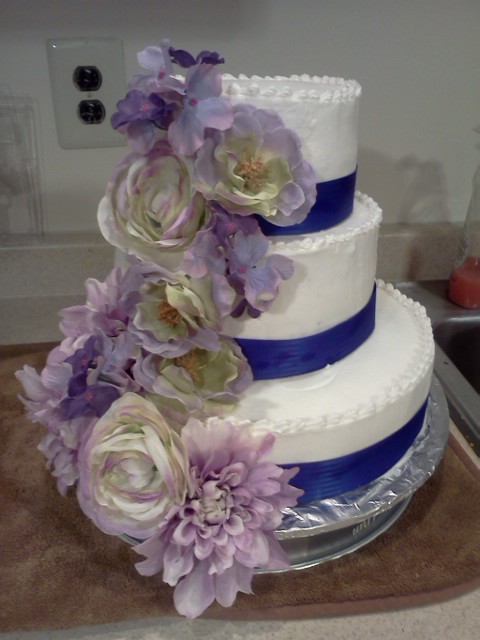
Purple satin ribbon that coordinated with the bridesmaid dresses was used to cover the cardboard between each layer for this cake. And those beautiful flowers... all silk! I kid you not, no one could tell if they were real gum paste flowers until the got up close and personal and had to 'touch' them! Simply cut your silk flower stem about an inch below the flower base and insert into the cake!
Now, I'm not sure if my cake would make the cover of Bride's Mag but it turned out lovely... tasted fantastic and everyone was happy! The whole cake cost just under $50 to assemble and was gifted to my bride... a great alternative to paying $100's!
Join me next time as we assemble some simple centerpieces!
***
If you are still with me {God Bless You} please hop over and enter to win a Ramsign House Number Enamel Plaque worth $99! There are pretty low entries so far so you have a great chance of winning!Party with me at Tip Toe Through Tuesday to show off what you've been doing this week! Giveaways and Etsy shops are welcome too!
and... Stop by and show my new blog Never Lose Your Sparkle some follow along love!
Linking with these Fantastic blogs Here!
1 comment:
Wow, great job. It totally looks professional.
Post a Comment